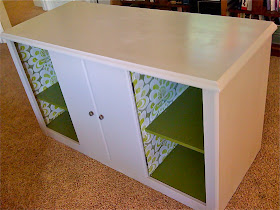
Look what I did!
After almost a month of work, this entertainment center is finally in my living room, and believe me, it was no easy task. Our entertainment "area" was in need of help. You see, we had these awesome Hawaiiana end tables and a coffee table from my parents vacation rental that we had stacked up to create shelving under the TV. See below right, last Christmas:
I have no idea what's going on with Ivy and "Sissy" in this pic. (Sissy's a doll, not a human). Forgive the mess, it was Christmas. I felt terrible having these gorgeous pieces stacked on top of each other, and I wasn't digging the Hawaiiana solid wood decor. I'd been scouring craigslist for an entertainment center for a few months, but really hated everything I saw. I even hated what we eventually picked up:
Kit hated it too, but for some reason he loaded it into the truck for $60. (Yes, we overpaid for something we hated.) Since he hated it, that meant I could do whatever I wanted to it. It was particle board, so I researched how to paint it. Kit sanded a lot of it for me:
Then I painted Kilz primer on it with a roller. I've heard lots of people say, "Just use the Kilz spray paint primer. It's just the same." It's not. It gives it a really bumpy texture. Lots of bubbles.
Then I started to get creative, and that was a bad idea...
I got green paint from a garage sale, right before I picked up Cailin from the airport a few weekends back. I also had a grey color called "Owl's Nest" I was dying to use. I put a layer of green on the inside and on parts of the outside, on areas which I was planning on stenciling.
I created two stencils out of cardboard. I wanted to lay them on the green areas, and then paint the grey around it.
Doesn't look too bad...
Well, when it dried, it was a mess. I don't know what I was thinking. The cardboard was stuck.
The grey paint was drying all weird in the curves.
Even though Kit and I both brainstormed as to how to salvage the idea, we eventually exhausted our resources and I just sanded it down and painted it all grey on the outside.
Then I needed to pay some attention to the inside. I loved the green, but because it was even thinner particle board inside, the sanding, paint and primer just weren't jiving. The green paint on the sides was just peeling off. So, I figured I needed to cover the sides in fabric. I was over painting this thing already. I loved the fabric I bought for my Vintage Train Case, but didn't have enough of it and I didn't want to go buy more fabric. I knew I could use my 2nd Urban Outfitters tapestry, which hung as a curtain in our dance studio on Kauai, (see photo below), but I was so sentimental about cutting it up... but the colors were perfect!
(yes, I was a prego dance teacher)
I gave in and cut it up, and modge podged it inside:
Even though I love a flat finish, I used a water-based varnish on all the paint surfaces for durability. After all, I have a two year old!
While I was cleaning up a mess Ivy made in my room, I came across some vintage knobs that came off my shiloh desk (see that desk here). (Btw- Shiloh and Owl's Nest are almost identical colors.) I love how they look, instead of the ugly gold knobs that came with it. Thanks Ivy for making a mess so I could find the perfect knobs and finish this piece!

And you can spot where my Vintage Train Case now lives...
It's my catch-all.
Kit made that white piece of art. Isn't it cool? It's made out of pallets.
I'm a way bigger fan of staring at this, rather than the stack of end tables. It took longer than I wanted it to, but I'm glad it's finally done!! I love sitting on the couch and staring at it! Waaaayyyy better than what we had before. And waaaayyyy better than some cookie-cutter particle board entertainment center... no offense if you have one of those. :)
Aloha, Rebecca


Looks perfect and it was fun to read about how you went about it! Cute photo of you too!! Thanks for sharing.
ReplyDeleteThanks Connie!
DeleteThat is amazing for particle board. Well done! It looks so much lighter visually then what you had before.
ReplyDeleteThanks Lorien! It's way better light, than dark. :)
DeleteWhat a job! It turned out fabulous... I ADORE that fabric you used on the inside...it's so cool!
ReplyDeleteThanks for linking up to the Bloggy Olympics Paint Event!
Thanks so much for having the Bloggy Olympics Paint Event!
DeleteWow...what alot of work! But, the end result is great!!
ReplyDeleteThanks so much for stopping by!
DeleteThis is great! How come I'm only seeing it today? Gives me some great ideas for all the particle board furniture I currently have in my home!
ReplyDeleteSand it! Kilz it! Paint it! I'm doing a particle board corner shelf unit as we speak.... !
Delete