Showing posts with label sand. Show all posts

Friday, May 23, 2014

Black-Washed Antique Side Table

As of May 4, my work schedule slowed down immensely. I've been pumping out furniture pieces during this down time. If you've been following for some time, you know that this year I've been obsessed with painting things black. 
(Click here and here and here and here and here to see what I mean). 
Well, here's another one for you. 

black wash antique side table vintage miss mustard seed typewriter 3 legs

I first introduced you to this little antique table in this post:
http://www.ivy-and-co.com/2012/08/upcycled-shutter.html

It was just simple wood. This little corner of my house is funny shaped, and eventually I found the perfect spindly corner bookshelf to put here and store all our books. Click here to see that post.

corner shelf book shelf grey

black wash antique side table vintage miss mustard seed typewriter 3 legsSo the little antique table floated around the house, until finally I was ready to part with it. I've seen this exact same piece painted in bright crazy colors, like turquoise and red, but that isn't really my style. 

black wash antique side table vintage miss mustard seed typewriter 3 legsSo I decided to "black-wash" it. 


black wash antique side table vintage miss mustard seed typewriter 3 legs

I used my go-to black: Miss Mustard Seed Milk Paint in Typewriter

black wash antique side table vintage miss mustard seed typewriter 3 legsblack wash antique side table vintage miss mustard seed typewriter 3 legs

black wash antique side table vintage miss mustard seed typewriter 3 legsI painted the whole thing, and then sanded it off, heavier in some places to show that great wood underneath. 

black wash antique side table vintage miss mustard seed typewriter 3 legs

I finished it with a coat of Miss Mustard Seed Furniture Wax. Of course, all her products are VOC-free. 

black wash antique side table vintage miss mustard seed typewriter 3 legs

It sold already, to a lady in a red shirt, via Craigslist. 

black wash antique side table vintage miss mustard seed typewriter 3 legs

Aloha, Rebecca


Read more ...

Friday, August 31, 2012

"that little unusable space" -- grey corner shelving


I recently started a board on Pinterest called "that little unusable space." It was dedicated to this little alcove in my living room that was too small for a chair to be placed in it, but too big to be left alone. A month or so ago I picked up an adorable 1/2 table to go there, (see post here), but I moved it when my mom came in and said, "I need your end table for one of the other houses." No hard feelings toward my mom... that's the nature of living with someone else's furniture in your house!

A few days later my parents were having a garage sale. It was a pretty awesome garage sale. You see, they have 4 vacation rental homes in Maui, which they update frequently, and so they were selling almost everything that wasn't currently being used. (If you are planning a vacation to Maui, go to their FB page to check out the accommodations!)  There was this particle board/wood/spindle corner shelf, which I would never buy in a store. But I love the spindles and knew I would love all of it in a different color! I brought it in the house and Kit said, "You're going to paint, that, right?" Normally, he's like, "Why do you have to paint all the wood furnishings in our house?" 
So I sanded it. Kilz'ed it. Then painted it in a flat Owl Grey, to match my entertainment center. After my first coat, I left it in our car tent to dry. Well, I didn't get back to it for almost a week. Within that time my husband informed me that birds were perching on it, using it as their toilet! So I had to clean it, scrub it and sand down that disgusting mess on the top shelf. Yuck. 


(see the entertainment center in the foreground? match-matchy!)

I like it way better, now that the shelving is not that dated particle board wood color. 


On a lot of my furniture I prefer a flat finish, but then feel like I need a clear varnish on it, 
especially with a 2-year-old in the house. But since this is just in the corner, 
holding a few books and accessories, I left it flat-- no varnish.


So this is what's currently occupying my "little unusable space." 
Do you have a space like that in your house? 

Oh, and if you have a blog post you want to share, 
our 2nd ALOHA Friday link party is up! Click here.

Aloha, 
Rebecca


Read more ...

Saturday, August 25, 2012

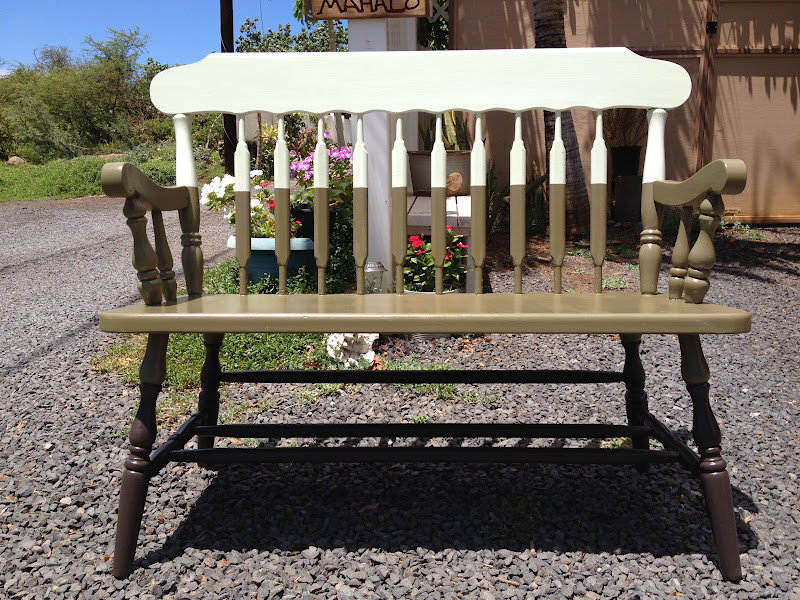
Ombre Bench

Just finished this ombre bench:


It originally looked like this:

Kit surprised me and picked it up on craigslist for $40. 

I was inspired a while back by this bench I pinned on Pinterest:

Here's my go-to steps for painting wood furniture:

1. sand
2. prime w/Kilz
3. paint
4. varnish (if there's going to be any wear-n-tear risk)

At first I painted the top portion yellow:

The middle color is actually a combination of the yellow and the espresso color on the bottom. I like to call it "puke green." I actually LOVE "puke green." But, I hated the bright yellow up top. It looked way different on paper. As much as Kit and I want to go back in time and live in 1970s Hawaii, I just couldn't keep these colors. Too "in-your-face" 70s. 


So, I turned to my trusty Benjamin Moore Hollingsworth Green, which I've used on my Kids Vintage Rocking Chair and my Upcycled Shutter, and painted over the yellow.


I used painters tape to mark off where I was going to switch colors. It wasn't the best tactic, because I did it right after I primed. I should have done it after I had a good coat of the puke green, then done the light green afterward.


Look at cute Godiva lounging in the background. :)


With some careful strokes and tiny brushes, I got up close and personal with the section where there was painters tape, and did my best to make it flow nicely.


I love it, but don't know where to put it! Kit wants it outside by our BBQ. I did put a clear varnish on it, but don't really want it exposed to sun, wind, Kihei dirt, etc. I want it on one side of our dining table. We will see. At some point I'm going to have to start selling some of this stuff I'm painting! Our 700 sq ft cottage can only fit so much!

Thanks for checking out my bench! Also, we've got a link party happening here till Wednesday night. Would love to have you link up!

Jed & Ivy

Aloha, Rebecca

Read more ...

Tuesday, April 17, 2012

This table... when will it be done?!!

 I'm desperately trying to finish the Kids Pottery Barn table and chairs...

I want it to be adorable and cute and FINISHED.

My original posts about this adorable set... (yes, posts is plural, because it's taking me forever!) are here and here.

Yesterday I worked on it. I'm proud to say that everything has a coat of paint on it. One coat. Two of the four chairs are completely FINISHED

But first, I had to do this to the table:


Thanks mom for lending me your garage sale find: liquid sandpaper.


I kept Ivy busy with a little bit of orange and purple paint, a box, and a paintbrush... well, the dog bowl ended up orange. Her slippers ended up purple. I asked her to look and smile for a photo, but she was too concentrated on her painting. 


Hopefully this never-ending (but enjoyable!!) project will be done by the end of the month so I can finally post my "after" at Shine Your Light blog's before and after party!

Aloha, Becca
Read more ...

Monday, January 23, 2012

Kids Pottery Barn Table

In December, one of my students' moms came up to me and said she had an old Pottery Barn kids table and chair set. She said, "It was a gorgeous set, but it's been used a lot and is more of a project, than a gift. We don't really want to give it to just anyone... Would you like to have it?" (Her daughter loves Ivy, and even named her American Doll "Ivy"... :) )

Little did she know that our car tent outside had been used by my brother and his wife to upcycle furniture for the past 4 months. Needless to say I gladly took the table and chairs off her hands. We started sanding it (see the green chair?), but haven't done much more than that. I'm dying to get my hands on it, but I think it is just a bit of a big project for me, so I'm reluctant to get started. I know what I want it to look like, but I'm procrastinating to get started. Here's some before pics. When I finally get it done, you'll see the afters.


Until then...

-Becca
Read more ...