Showing posts with label ribbon. Show all posts

Sunday, March 2, 2014

Sew, I Made A Shirt

vintage fabric tunic with pocket floral
I made this shirt/tunic/whatever you want to call it, in about an hour. No joke. Serves me well, because I've been thinking about making this shirt for about 3 years, ever since I found this glorious vintage fabric at a garage sale. It's a thick woven cotton floral, reminiscent of some upholstered chair from the 1970s. I love it. 


I never use patterns. And it's either me or Ivy wearing the clothes I make, so I'm not trying to go for perfection, here. I started cutting out the pieces of this shirt at about 1:00am one night. I knew I couldn't sew it that late, because I'd wake up the whole house. (pardon the cheesy modeling photos taken by my husband in front of our red door)

The next morning Ivy had a birthday party to go to, and I really wanted to wear my new shirt! So I sewed the pieces all together in about 20 minutes. No joke. That's how motivated I was to make and wear this thing!


I wish I had time to re-do the back elastic gathering (see that tuck on the left?) 
I also would have preferred to use different straps, even though I LOVE the color of them. It's just ribbon!
back view vintage fabric shirtfloral vintage fabric handmade shirt

And, the best thing happened while wearing this shirt, I got to meet this little cutie for the first time. :)

Good things happen in good shirts!

Aloha, Rebecca
Read more ...

Friday, August 2, 2013

DIY Felt Princess Tiara and Wand

At 2:30 a.m. my dog started barking. I got up to shush her, and an hour later, I'm still up. This has happened a few times this week now... I'm hoping it's not some new habit that's forming within Godiva, or my body's sleep pattern :( I'm hoping a little "screen time" will put me to sleep, though I'm sure the effect is counter productive. 

But, it has been a while since my last blog post, so my insomnia is a blessing in disguise. It's not like I've been busy or anything... I've just done 2 dance camps, finished out the summer dance semester and choreographed Fame. So while I work out my insomnia issues, I'll tell you about a little project that's been sitting in my archives since, oh, last December!

DIY felt princess tiara

DIY princess tiara with wand feltIvy was invited to a birthday party, and I really wanted to give the little girl a homemade gift. So Ivy and I whipped this Tiara and Wand set out. 

Actually, we whipped out two, cause Ivy wanted one for herself.

DIY princess tiara with wand feltDIY princess tiara with wand felt

Here's what I used:
-elastic
-felt
-bias tape
-vintage button
-ribbon
-small piece of netting
-dowel
-sewing machine
-glue gun


DIY princess tiara feltDIY princess tiara felt

TIARA:
1- I made a "scrunchie-style" tube to encase the back elastic section of the tiara.
2- I cut a tiara front out of felt.
3- I threaded the elastic through the scrunchie tube and then sewed the ends of the elastic to the outer edges of the tiara.
4- I sewed the bias tape along the bottom edge of the felt, and used it to cover up the edges of the elastic/scrunchie tube.
5- Use the glue gun to decorate with ribbon and a button!


DIY princess tiara felt

WAND:
1- I wrapped the dowel in ribbon, using the glue gun to secure it along the way.
2- I cut out 1 felt star and a felt circle (it's the yellow felt behind it).
3- I sewed long strands of ribbon and a piece of netting to the center of the star  (the button is covering the stitch)
4- Glue gun the felt pieces to the dowel, and to each other.
5- I chose to stitch two sides of the star to the circle, through the netting, just to make it more secure.


DIY princess wand felt

And that my friends, is what we did. 

DIY princess tiara with wand felt

My eyes are heavy now, so thank you. Here's to sweet dreams of princesses with their tiara's and wands. :)

Aloha, Rebecca
Read more ...

Monday, October 29, 2012

DIY Starfish Costume

Somehow Ivy got it in her head that she was going to be a Starfish for Halloween. I have no idea how she came up with this. Why couldn't she be a Super Hero? (I made a cape for her already, see post here). Or Rapunzel? Or Cinderella? We have those costumes... (see post here). But no, a Starfish. I have to admit, I thought it was a great idea, (super creative) but I didn't want to get it wrong, because I knew my decisive child had some type of vision of what her costume would look like. After a little prying and convincing, we decided it would be a Starfish Princess costume. (That was my vision, and what I knew I could pull off). I went to Sew Special and Ben Franklin and got some fabric and accessories. Ivy had a hacking cough, so we couldn't go to church the next day, so I had a whole Sunday to put this together.
DIY Starfish Costume girl smiling beach
Supplies:
-white leotard (Ivy had a white leotard already)
-white tutu (I got one from Icing for $6.25)
-1/2 yard of orange seashell fabric ($2)
-1/2 yard of white star fabric ($2)
-1 yard of green star fabric (had this)
-faux fishing net ($6.99)
-starfish ($4.99)
-yellow mesh netting (had this)
-orange bias tape (had this)
-green leaf ribbon ($2.99)
-glittery gold Christmas leaf decor ($4.99)
-headband ($1.50)
-small piece of felt
-sewing machine
-scissors
-glue gun
-thread
DIY Starfish Costume ben franklin suppliestutu leotard DIY Starfish Costume


DIY Starfish Costume star cut-out1. I cut out 4 large stars for the skirt, and 4 smaller stars for the bodice. (Green was the underneath color. I just layer the fabric over the tutu and made it a little wider than the tutu. Same for the leotard. I wanted it to slightly wrap around the tutu.) 

DIY Starfish Costume skirt2. I sewed the stars together right side in, (orange w/green, white w/green) but left a little seam open so I could flip it right side out.  

3. After flipping it right side out, I re-sewed the edges so that they would lay flat.

4. I layer the stars over the tutu, and sketched a hole over the waist band, then cut out a circle. This was a very ghetto way of doing this. I tacked net and "seaweed" (the green leaf ribbon) to the orange star and glue gunned starfish to the edge of the orange star. Then I sewed orange bias tape around the waist. I wish I thought through this part a little better. Luckily Ivy is a skinny-mini and can just slip this on over her non-existent booty, but in all honesty, I needed to put some type of elastic waistband here. Oh well... 
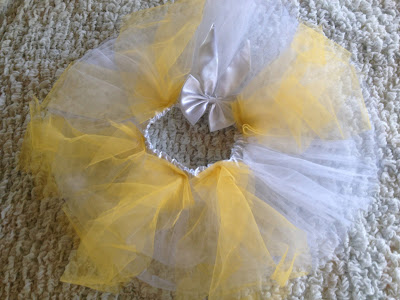

DIY Starfish Costume skirtDIY Starfish Costume skirt
DIY Starfish Costume leotardDIY Starfish Costume skirt leotard

DIY Starfish Costume skirt5. I tacked a few piece of the yellow mesh netting onto the tutu, to give it some "life & depth" under the starfish.
6. Since all the Christmas decor was out at Ben Franklin, I picked up this gold Christmas leaf decor thing. I think you're supposed to put them in a vase? (I'm not really all about putting fake plants in vases.) I made sure to choose one that looked like seaweed. I cut off some pieces and sewed them under the orange stars on both the bodice and the skirt portion, so they would "peek out" from under.
   
7. I got a yellow headband from Icing for $1.50 on clearance. I cut a circle out of white felt and glue gunned the mesh, the leaf ribbon, the gold Christmas seaweed and a starfish onto the felt. When it dried, I glue gunned the felt to the yellow headband.

DIY Starfish Costume girl on beachDIY Starfish Costume headband


Of course, as is the case in every Ivy/Becca project, it results in an informal photo shoot. No children were harmed in this shoot. All pure fun! For this particular shoot, I chose the beach in front of my late grandma's condo, where she lived for at least 15+ years before she passed away last year. It's 2 blocks from my house, and I hadn't been to the condo or the beach since July 20, 2011, (the day before it sold.) My, Ivy and my dad (it was his birthday) had gone there for one last swim in the pool. My grandma taught kids to swim for much of her life, and being the fact that Ivy just finished her first round of swimming lessons, I'm a little sentimental and wish my grandma were here to teach her. My grandma also had lived on a boat in Florida and had such a love for the ocean. She definitely passed that on to her family. Maybe that's why Ivy chose to be a starfish?!
DIY Starfish Costume girl on beach

DIY Starfish Costume girl on beachDIY Starfish Costume girl on beachDIY Starfish Costume girl on beachDIY Starfish Costume

DIY Starfish Costume Hawaii


DIY Starfish Costume with mermaidDIY Starfish Costume with mermaid hawaii


 So for $31.71 plus tax, this is a custom-made Starfish Princess Costume! Not bad. And to think I almost gave in and picked up a Wal-mart costume for $19.99...

Be safe this Halloween!
Aloha,
Rebecca

DIY Starfish Costume girl on beach

Read more ...

Saturday, August 25, 2012

Pink & Purple Bunting

We moved to Maui almost 3 years ago from Kauai. Even though I'm originally from Maui, it was one of the hardest decisions we had to make, because we had so many great friends on Kauai. A few months later, one of those friends moved all the way to Florida! That's clear across the country! Well, she just had her second baby, (a girl!) and I wanted to send her a gift. I made her this bunting:


I spied on her Facebook a quilt she made, and tried to stick with a similar color scheme. 

I make a lot of bunting, but for this one I wanted to use a bunch of ribbons on the ends, instead of just one, like I normally do. 

I love the detail in the white fabric. 
And I'm pretty much obsessed with the chevron/feather print on the left. 


BTW- Kulia is Ivy's middle name. Kit made that pallet for her room.


And Kit made this ALOHA pallet. 
(Have you linked up to our "ALOHA Friday" party yet? If not, click here! ... shameless plug.)

That blue-ish/purple is a really cool fabric too, and for some reason it's in the sale section at Sew Special!


I love making bunting. Here's what you need:

-fabric cut into triangles
-double fold bias tape
-ribbon(s) for hanging it

Pretty simple to make!


Thanks for visiting!
Aloha, Rebecca

Photobucket

Read more ...

Monday, April 9, 2012

New Project for a New Baby Boy

Haven't had much time to blog. I work for a Performing Arts organization and the dance department's year-end recital is at the beginning of May. Less than a month away, so I have been spending a lot of time prepping for that. But, Monday is my day off and today I decided to really take the day off, and do a project. 

A friend had a baby recently and I wanted to make my signature bunting. Also, I have been dying to try this tutorial for a Fabric Bucket from here. So I got out my adorable Squirrel Fabric, and every piece of coordinating fabric I own, and made this:


I used these fabrics, but nixed the white at the last second. Too many solids.


Started with the triangular bunting...


Best tip ever: snip the corners!


End product:


These squirrels and birdies are just adorable. 
Those are the same aqua birdies from the pillow in this post.


 Can't go wrong with grey and white polka dots.

I don't love the black bias-tape on top, but I can't find aqua or grey bias tape anywhere! Orange would have looked good, but I doubt it would have been burnt sienna enough to match the acorns... so I had to settle for black. 


 And now for my new creation, the fabric bucket. 

The top can be folded down...


Or left up...


There's a great tutorial at http://inspiredbyfamilymag.com/2012/01/15/diy-fabric-bucket/ so I won't repeat the work they've already done...


I used felt instead of interfacing... I'm too cheap to get interfacing, plus I always forget to look for it at the store. 


Btw-- the bucket is sitting on one of the Kids Pottery Barn chairs I've been working on for forever. I've completed painting 2 out of 4 of them. See full post here.

I sewed a little X on the bottom to give it an extra element.


A look inside...


Stuff diapers, wipes, etc. in it. 


I can't get over the natural lighting that was coming in when I took these photos.


I haven't given it to the recipient yet, but I hope they like it! It was fun to do a new sewing project. It was pretty easy to follow the tutorial. I got some great new fabric today that matches Ivy's room: dark blue, light greens and pink and grey and white... and... and... just kidding. Anyway, I want to make one of these fabric buckets for her room. 

Check out my other bunting posts here and here and here.

Aloha, Becca

Three Mango Seeds


Read more ...