Showing posts with label fabric bucket. Show all posts

Monday, January 28, 2013

Pretty Recycle Bin

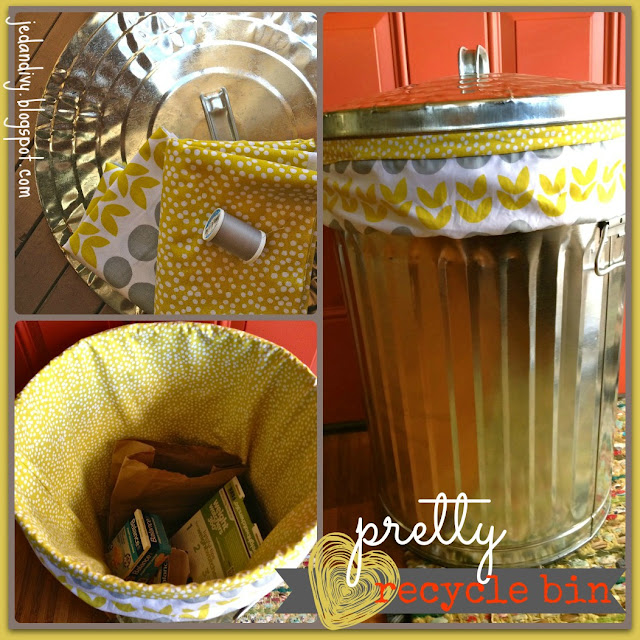
A few months ago our trash service decided they weren't going to pick up trash twice a week anymore. Instead, they were going to pick it up on Sundays, but then on alternating Wednesdays they were going to pick up Recycling and Green Waste. The recycling bin they provided for us was kind of far from our house, since there are a couple homes on our property that share the trash service. So what happened next was that piles of recyclables were ending up in our kitchen, next to the indoor trash can, and on our deck, before they were taken over to the main recycle bin. Something had to be done!! Of course, I made something...


I saw this pin on pinterest and was inspired.


Here's what I used:

-metal trash can (I think it's a 16 or 20 gallon), $25 at ACE Hardware (kind of pricey, but that's what you get on an island!)
-4 yards of fabric (I got 2 yards in the polka dot, and 1 yard of the yellow/grey, and it wasn't quite enough. I supplemented by making the bottom out of some grey fabric I had at home.
-thread

I mainly followed the fabric bucket tutorial from Inspired by Family Magazine here. I use it alot :)
I measured the top of the trash can circumference and the bottom. I cut out fabric with the appropriate top length and bottom length. Then I stenciled a circle with fabric on the bottom to create the bottom part of the bag. 


Follow the original tutorial for all the details. I didn't use any interfacing, however, I did stitch some thick terry cloth in the shape of an 'x' spanning the bottom circle, just for a little extra re-enforcement while carrying it. The other revision to the original tutorial is that I added a strip of the yellow/grey printed fabric along the top and inserted elastic in it so that it would be secure when folded over. 


I will admit, my husband was smirking through the whole process of me making this, haha. He just didn't see why it needed to be, well, pretty. I sensitively told him to just let me make it and to try not to go searching and analyzing the reason behind it. It's a girl thing. :) We like things to be pretty. And this pretty recycle bin now sits on our deck, instead of piles of recycling.
Read more ...

Thursday, December 27, 2012

Hobo Nutcracker Gift Exchange

Working for a performing arts organization, it's no surprise my work Christmas gift exchange ended up with the theme: "Hobo Nutcracker." I was stoked on the name I pulled. It was our new Office Administrator whom I went to high school with. I knew I could make her some festive bunting, buy her some cute accessories, and put it all in a fabric bucket hung on a hobo stick. So here's what we ended up with:


I wanted it to be festive, but not "in-your-face" Christmas-ey." Color palette: red, white, cream, brown, yellow


I used some of my favorite fabrics. 
Stars. Peacock feathers. Faux burlap in red and brown.


I used the normal fabric bucket tutorial I always use, but added the ribbon loops for a larger ribbon to be threaded through, so it would have the "hobo" effect. 


And here's Ivy demonstrating the hobo portion. I love having spare bamboo lying around, for moments like this. After modeling it, Ivy insisted she have her own hobo stick. After listening to her beckon me for a hobo stick for 3 days, I finally gave in and made her one too. 
Hope you're having a wonderful holiday season!
Hau'oli maka hiki hou!

Aloha, Rebecca
Read more ...

Sunday, December 2, 2012

Ivy's Green and Blue Room Tour

We live in a tiny cottage that used to be one of my parents' Vacation Rental units here in Hawaii. Even though it's small, I love making it into a fun little home for Kit, Ivy and I. Especially for Ivy. Let me take you on a "tour" of her green and blue room. 

First of all, all of the dark blue furniture was mine. My dad built me this bed when I turned 15. I got to design it when I finally had permission to stop sleeping in my canopy princess bed I'd had since I was 3. :) When I was 21 and moved home after college and living abroad, I painted it blue, and added the dark blue side table and bookshelf, which my dad also built for me. I was so excited when Ivy transitioned out of the crib, so I could let her sleep in my old bed. I like that kind of thing.


This mobile hangs above her bed. It's made out of a 3-prong metal plant hanger. I made it when we moved into this house when Ivy was 6 months old. The butterflies were a gift a student gave me, and Cailin had tied that blue ribbon around our dog Godiva's neck when we brought Ivy home from the hospital. Such a special moment. 
 I made the bunting in the window, as well as that heart garland (click here to see that post). Kit made the "Kulia" plaque (that's Ivy's middle name, meaning 'fortunate'). 

The doll on Ivy's bed is named "Amy" and she's 29 years old. 
My late aunt Sara made her for me when I was born. 
I wore her dress home from the hospital. 
On the right is a little side table. I got it at a garage sale 7 years ago. 
Sitting on the table is a fabric bucket I made, in the same fabric as her chair cushions. It contains some of the only pink decor in the entire room...! I have nothing against pink, but the child is named "Ivy." I think it's only appropriate that her room match her namesake, at least a little. We are also super into the ocean, so I think she should be surrounded by blue too. There will be plenty of time for tons of pink and purple things in her life. :) 
The fabric bucket also matches this hat box I recovered the other day, which now holds her Barbie's. Tutorial on that coming soon. :) For other fabric bucket tutorials and posts, click here, here and here.


If you've been following me for a while, you will recognize the Kids' Pottery Barn table and chair re-do. There's 4 chairs in the set, but I keep one next door at my parent's house. Ivy's room is just too small! For the full post on this re-do, click here. It holds her coffee maker and tea set. The placemat is from Cailin... Urban Outfitters! (I have it in orange, too.) The rug is also from UO. I made the chair cushions. Click here for that post. 

 Like any good room designed in 2009 or later, Ivy's got a gallery wall. It contains the letters of her name (of course), torn out pages from a vintage book (of course), maternity shots of Ivy in my tummy (of course) and family photos (of course). PS: the fabric in the long frame is one of my absolute favorite fabrics of all time.
 Photos are by:
Sears (the family portrait down below that looks like we're from the 1970's)

I LOVE this picture/book page/illustration:

Here' the view looking "out" of Ivy's room. I use shoe storage on the back of her door to give a home to random toys. 
And of course, the bunting. My reason for starting this blog. I love to make bunting. Want some? Give me a color scheme, style and length and we can do a transaction via my Etsy shop. 
Oh, and these awesome floor-length curtains are from Pier 1. I LOVE them. They're kind of the reason I did this room tour. I felt like her room was finished once they were up. 

Thanks for taking the tour!
Aloha, Rebecca
Read more ...

Monday, April 9, 2012

New Project for a New Baby Boy

Haven't had much time to blog. I work for a Performing Arts organization and the dance department's year-end recital is at the beginning of May. Less than a month away, so I have been spending a lot of time prepping for that. But, Monday is my day off and today I decided to really take the day off, and do a project. 

A friend had a baby recently and I wanted to make my signature bunting. Also, I have been dying to try this tutorial for a Fabric Bucket from here. So I got out my adorable Squirrel Fabric, and every piece of coordinating fabric I own, and made this:


I used these fabrics, but nixed the white at the last second. Too many solids.


Started with the triangular bunting...


Best tip ever: snip the corners!


End product:


These squirrels and birdies are just adorable. 
Those are the same aqua birdies from the pillow in this post.


 Can't go wrong with grey and white polka dots.

I don't love the black bias-tape on top, but I can't find aqua or grey bias tape anywhere! Orange would have looked good, but I doubt it would have been burnt sienna enough to match the acorns... so I had to settle for black. 


 And now for my new creation, the fabric bucket. 

The top can be folded down...


Or left up...


There's a great tutorial at http://inspiredbyfamilymag.com/2012/01/15/diy-fabric-bucket/ so I won't repeat the work they've already done...


I used felt instead of interfacing... I'm too cheap to get interfacing, plus I always forget to look for it at the store. 


Btw-- the bucket is sitting on one of the Kids Pottery Barn chairs I've been working on for forever. I've completed painting 2 out of 4 of them. See full post here.

I sewed a little X on the bottom to give it an extra element.


A look inside...


Stuff diapers, wipes, etc. in it. 


I can't get over the natural lighting that was coming in when I took these photos.


I haven't given it to the recipient yet, but I hope they like it! It was fun to do a new sewing project. It was pretty easy to follow the tutorial. I got some great new fabric today that matches Ivy's room: dark blue, light greens and pink and grey and white... and... and... just kidding. Anyway, I want to make one of these fabric buckets for her room. 

Check out my other bunting posts here and here and here.

Aloha, Becca

Three Mango Seeds


Read more ...